omniauth로 rails app에 oauth2 인증 추가하기
표준화된 multi-provider 인증 라이브러리 (미들웨어).
인증 서비스를 제공하고 싶은 provider는 omniauth strategy 클래스를 extend한 strategy를 작성해서 제공하면 된다.
(파악하고 나니까 omniauth는 oauth2 Flow에서 레일즈 app을 찌르는 케이스를 미들웨어로 처리하기 위한 gem이다.
각 provider가 이걸 상속받아서 일관된 인터페이스로 여러 provider 인증 추가 가능.)
예를 들면
페이스북으로 로그인 하기 => https://github.com/simi/omniauth-facebook
네이버로 로그인하기 => https://github.com/kimsuelim/omniauth-naver
omniauth-oauth2 는 omniauth의 더 일반적인 oauth2 Strategy 이고
omniauth-naver는 이 OmniAuth::Strategies::OAuth2 클래스를 상속받아 naver strategy를 작성하고 gem으로 제공한다.
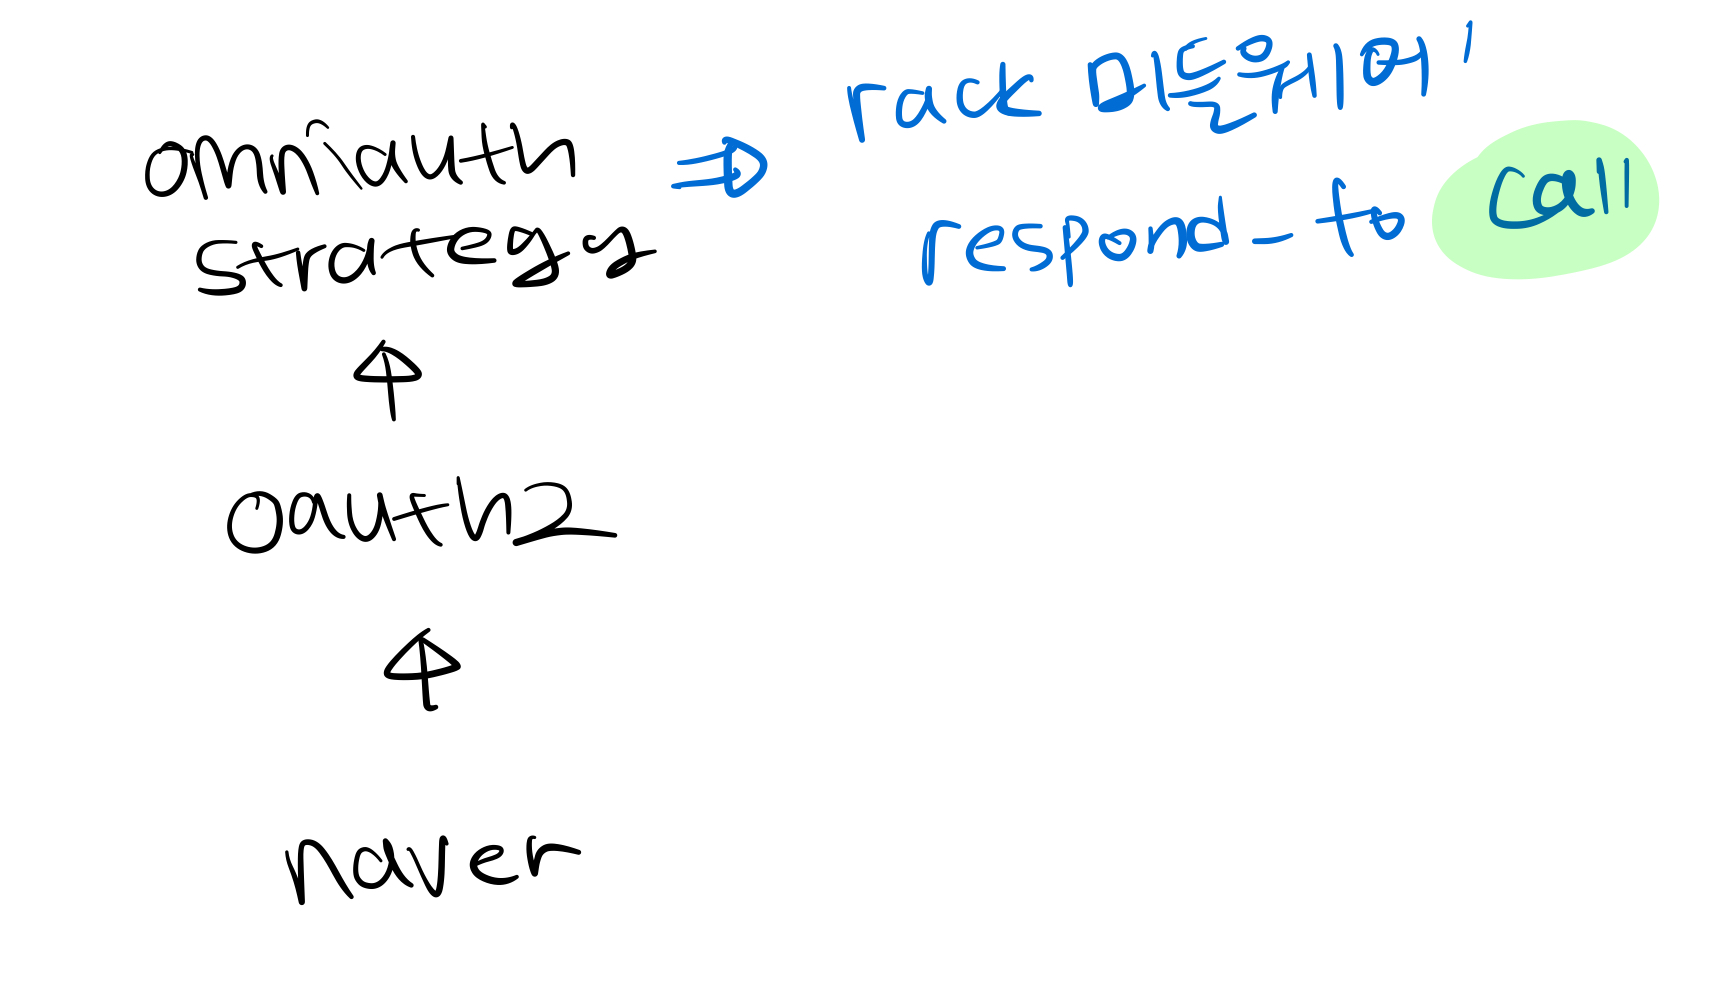
strategy는 결국 rack 미들웨어 이고 call을 호출할 수 있는 객체이다.
rails에서 이런식으로 naver strategy를 미들웨어로 chain에 등록해서 관련 로직을 처리한다.
Rails.application.config.middleware.use OmniAuth::Builder do
  provider :naver, ENV['NAVER_KEY'], ENV['NAVER_SECRET']
end
require 'omniauth-oauth2'

module OmniAuth
  module Strategies
    class Naver < OmniAuth::Strategies::OAuth2
      option :name, 'naver'

      option :client_options, {
        :site => 'https://nid.naver.com',
        :authorize_url => 'https://nid.naver.com/oauth2.0/authorize',
        :token_url => 'https://nid.naver.com/oauth2.0/token',
      }

      uid { raw_properties['id'].to_s }

      info do
        {
          'name' => raw_properties['name'],
          'email' => raw_properties['email'],
          'gender' => gender,
          'image' => image,
          'nickname' => raw_properties['nickname']
        }
      end

      extra do
        {:raw_info => raw_info}
      end

      private

      def gender
        return if raw_properties['gender'].nil?
        return 'male' if raw_properties['gender'].include? 'M'
        return 'female' if raw_properties['gender'].include? 'F'
      end

      def image
        return if raw_properties['profile_image'].nil?
        return raw_properties['profile_image'].sub('?type=s80', '') unless raw_properties['profile_image'].include? 'nodata_33x33.gif'
      end

      def raw_info
        @raw_info ||= access_token.get('https://openapi.naver.com/v1/nid/me').parsed
      end

      def raw_properties
        @raw_properties ||= raw_info['response']
      end
    end
  end
end

OmniAuth.config.add_camelization 'naver', 'Naver'
이 gem에서 어떻게 authorization code flow를 구현하고 있는지 한번 간단히 까보자.
💡 Authorization Code Grant
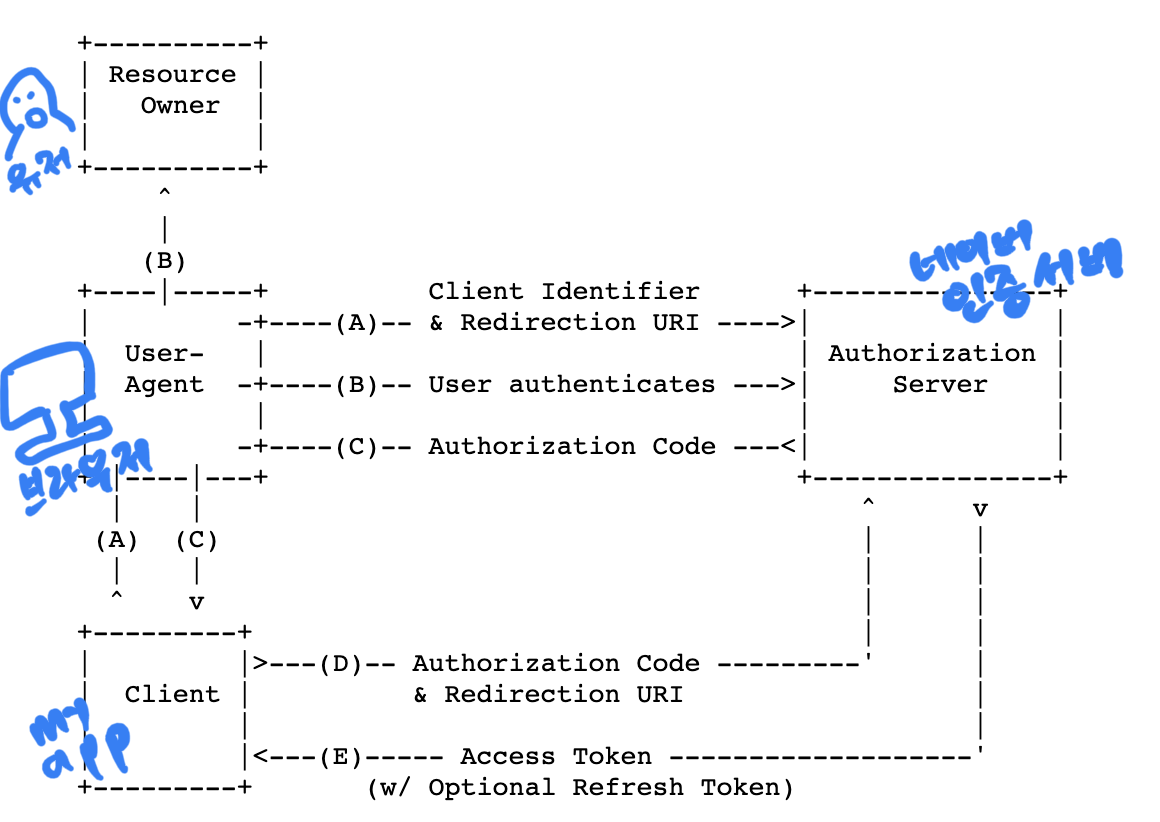
oauth2 에서 어떤식으로 왔다 갔다 해서 인증하고 access-token을 발급해주는지 flow 가 여러가지 있는데 대표적으로 아래 4가지가 있다.
- Authorization Code => xx로 로그인하기 해서 브라우저에 auth provider의 로그인창이 뜨고, 3rd party 웹사이트로 리다이렉트 되어 되돌아오는 케이스는 거의 이 방식.
- Implicit => Authorization Code에서 서버끼리 code를 access-token으로 ( 3rd party <-> auth server) 바꾸는 과정을 생략하고, 콜백 url 에 파라마터로 access-token을 바로 전달. 보안상 이슈로 요즘은 거의 사용하지 않는 추세
- Password => 3rd party가 직접 id/pw를 들고 access-token으로 바꾸는 방식. 간단해서 보안상 좋지 않은데 service account 같은 machine 간의 인증 같은 use case가 있음. 이것도 client credentials 를 쓰면 되는거라.. 비추 방식이라고 함.
- Client Credentials => 주로 서버 to 서버 일때
일단 간단한 데모 프로젝트를 생성하는 것은 다음 블로그 내용을 따라했다.
https://dev.to/superails/omniauth-without-devise-26mc
(github 대신 naver strategy 사용)
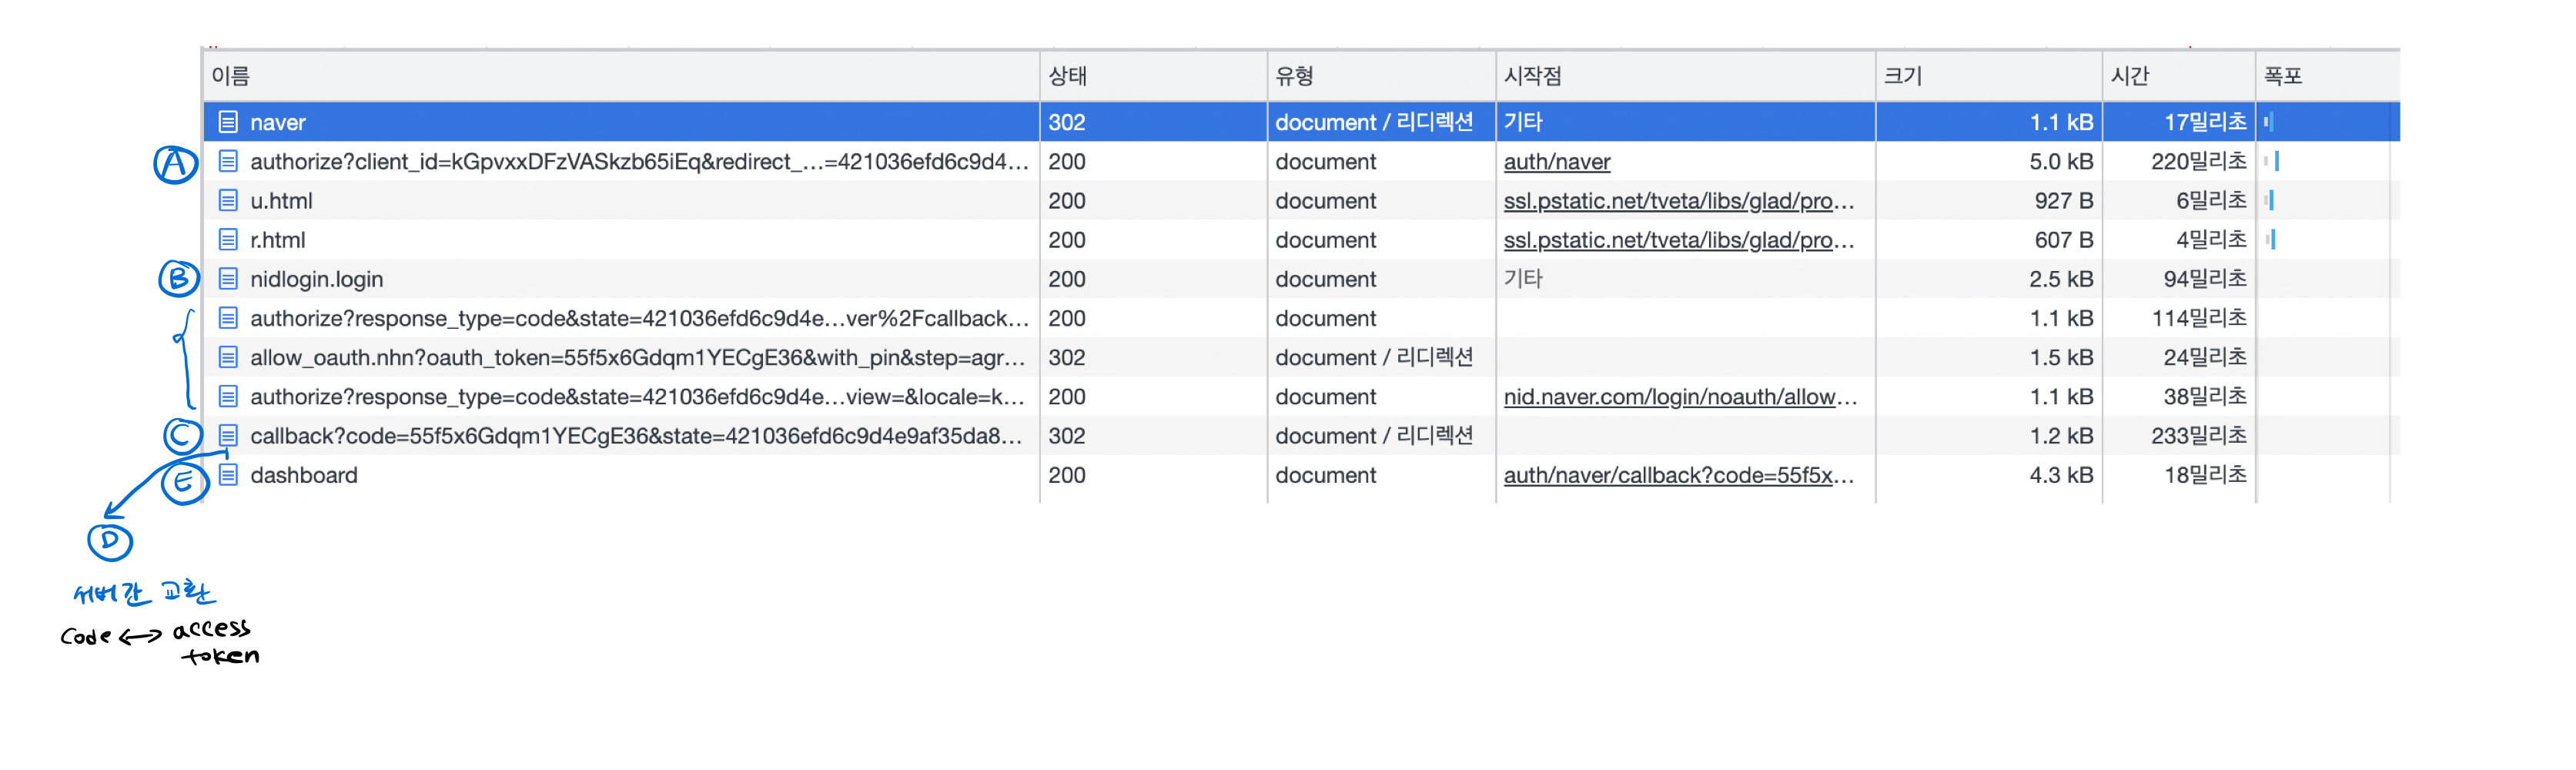
그리고 크롬 네트워크 탭에서 어떤 api 를 주고받았는지 살펴보면 이렇다.
strategy 미들웨어의 call 메소드 pseudo code
def call(env)
  # on_request_path? (path ==? /auth/naver)
  # on_callback_path? (path ==? /auth/naver/callback)
  return options_call if (on_request_path? || on_callback_path?) && options_request?
  return request_call if on_request_path?
  return callback_call if on_callback_path?

  # 해당 사항 없으면 다음 미들웨어 호출
  @app.call(env)
end
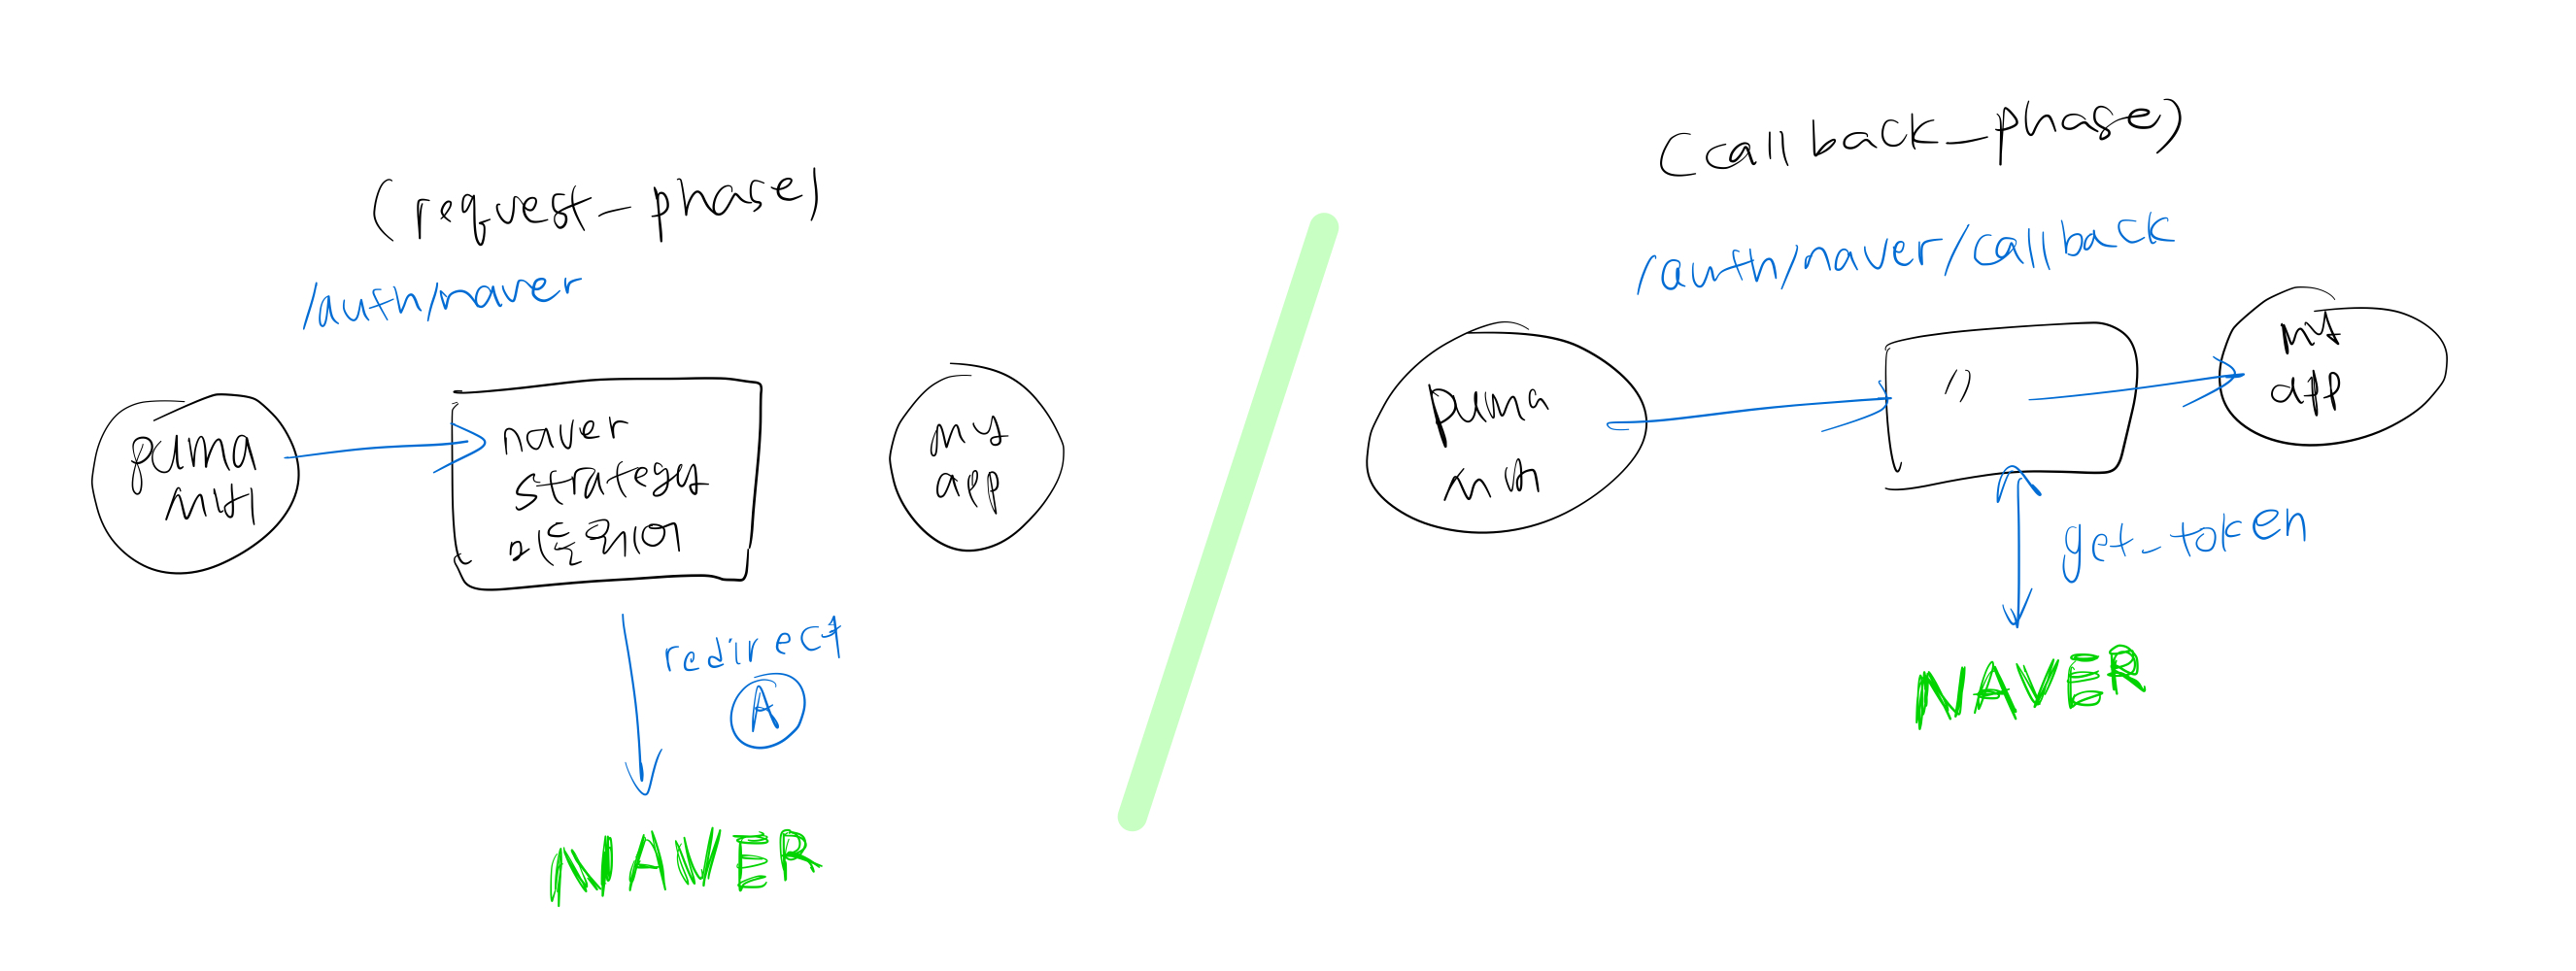
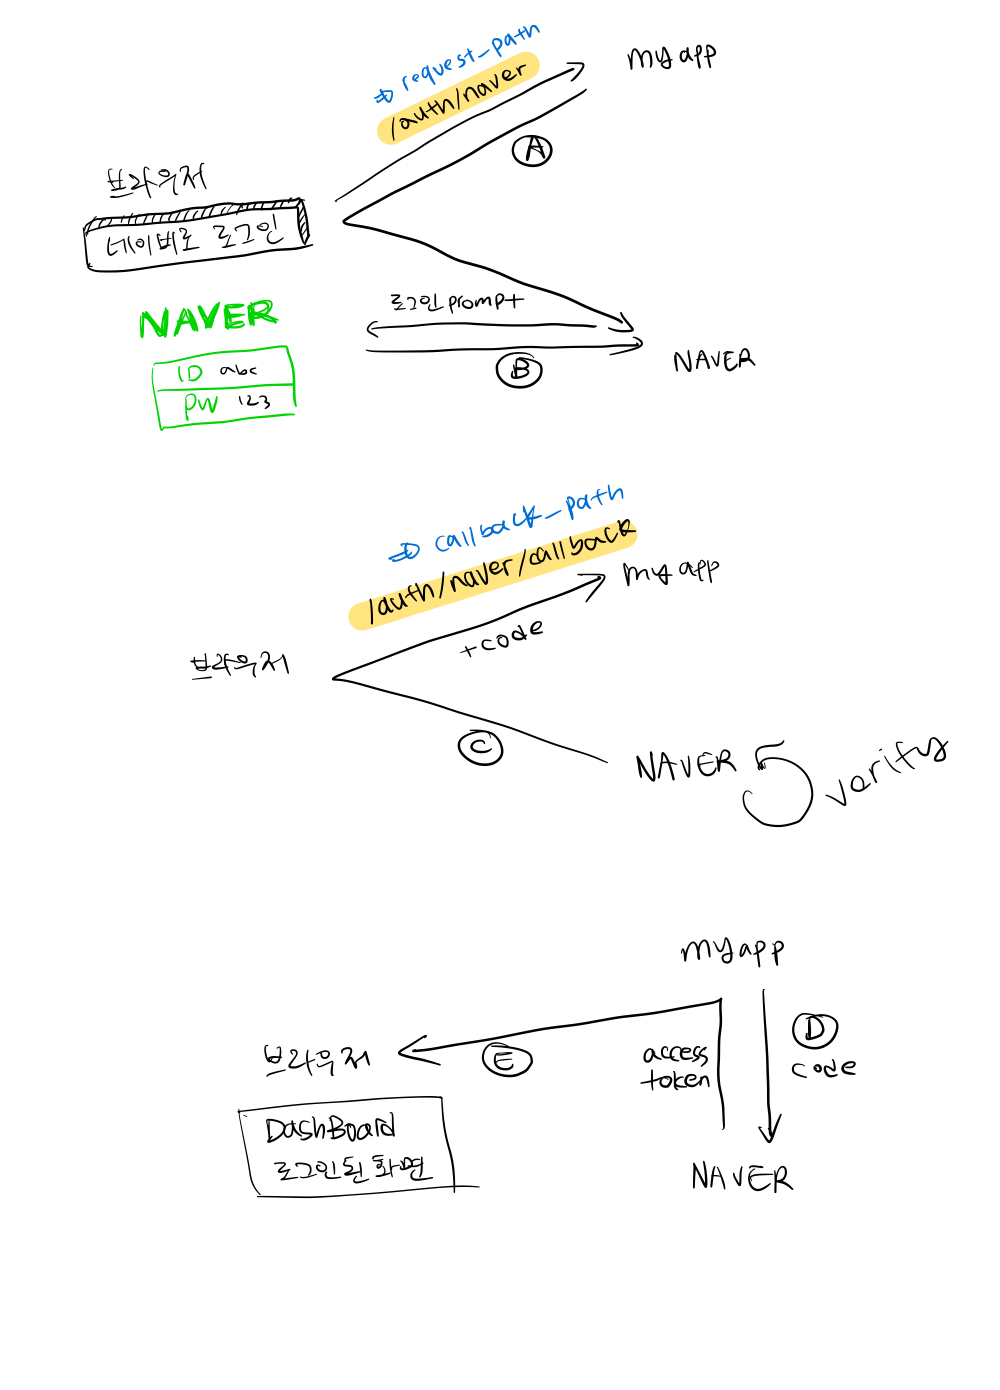
myapp 호출 path가 /auth/naver 라면 strategy 미들웨어에서 request_call 이 실행됨
=> authorize_url 로 리다이렉트 [A]
# 호출 path가 /auth/naver 일 때
def request_call
  request_phase
end

# 각 strategy 에서 오버라이드
# oauth2 strategy일 경우 다음과 같음
def request_phase
  # authorize_url로 리다이렉트
  # 파라미터
  # - redicrect_uri
  # - 등등..
  redirect client.auth_code.authorize_url({:redirect_uri => callback_url}.merge(authorize_params))
end
myapp 호출 path가 /auth/naver/callback 이라면 미들웨어에서 callback_call이 호출됨
=> 파라미터로 받은 code 를 auth 서버에서 access-token으로 교환 [D, E]
=> rack env 에 auth_hash 값을 설정해주고
=> 다음 미들웨어 호출
( 그럼 그대로 rails /auth/naver/callback 를 찌르고 라우터 설정대로 sessions#create에 도달. 해당 액션 실행한 뒤 dashboard 로 리다이렉트)
# 호출 path가 /auth/naver/callback 일 때
def callback_call
  before_callback_phase
  callback_phase
end

# oauth2 strategy에서 오버라이드 한 로직
def callback_phase
  # code를 access_token으로 바꾸고
  self.access_token = build_access_token
  # rack env에 auth_hash 설정
  env['omniauth.auth'] = auth_hash
  # 다음 미들웨어 호출 (=> rails 호출 계속 -> sessions_controller#create)
  call_app!
end

# code <-> access_token
def build_access_token
  verifier = request.params["code"]
  client.auth_code.get_token(verifier, {:redirect_uri => callback_url}.merge(token_params.to_hash(:symbolize_keys => true)), deep_symbolize(options.auth_token_params))
end
(💡참고)
# naver strategy에 설정된 option
option :client_options, {
  :site => 'https://nid.naver.com',
  :authorize_url => 'https://nid.naver.com/oauth2.0/authorize',
  :token_url => 'https://nid.naver.com/oauth2.0/token',
}

# naver auth_hash
{
  :provider=>"naver",
  :uid=>"48436401",
  :info=>{
    :name=>"홍길동",
    :email=>"foobar@naver.com",
    :gender=>"male",
    :image=>"https://phinf.pstatic.net/contactthumb/52/2014/8/4/kimsuerim_1407162661934.jpg",
    :nickname=>"길동"
  },
  :credentials=>{
    :token=>"AAAAObBDnBitK5i1qRDH4S2OUFvBMMsxWURxpLPNPhQyIyb7bIfH/dUqf1T3e5a5A87X6SntI74aUVIMPupBqKPYB3s=",
    :refresh_token=>"zdaiiVqKazKWlunUlTbgqjGs0LujvvWjNipKMQSXRQipVFJ5PT0TjNTaq1Yj3oRkaCAUAtMAxHipX2qqzdRNxDoetN7h1Z68YICNujmBjdcZ8aT93sNqxMKXwBgsKW6LPlez",
    :expires_at=>1526543399,
    :expires=>true
  },
  :extra=>{
    :raw_info=>{
      :resultcode=>"00",
      :message=>"success",
      :response=>{
        :id=>"48436401",
        :nickname=>"길동",
        :profile_image=>"https://phinf.pstatic.net/contactthumb/52/2014/8/4/kimsuerim_1407162661934.jpg",
        :age=>"30-39",
        :gender=>"M",
        :email=>"foobar@naver.com",
        :name=>"홍길동",
        :birthday=>"01-08"
      }
    }
  }
}
myapp sessions#create
  def create
    # 유저 레코드 새로 저장하고 (find_or_create_by)
    @user = User.from_omniauth(request.env['omniauth.auth'])
    if @user.persisted?
      # 세션에 user_id 저장 (default session_store = cookie. 암호화해서 저장함)
      session[:user_id] = @user.id
      redirect_to dashboard_path, notice: "Logged in as #{@user.email}"
    else
      redirect_to root_url, alert: 'Failure'
    end
  end
얼추 숨겨있는 로직들이 다 밝혀진 것 같다.
그럼 마지막으로 더 간단하게 정리하면 이렇게 말할 수 있겠다.
Authorization Code Grant Flow 에서
[1] myapp이라는 rails app으로 들어오는 호출 => omniauth strategy 라는 미들웨어를 사용해서 로직 처리
[2] naver 인증 서버로 들어오는 호출 => 1) 로그인 프롬프트 넘기고, 2) 로그인하고, 3) redirect_uri로 받은 주소 callback 호출 해주고, 4) code 유효성 검증하고 access-token으로 바꿔주고.. 이런 로직들은 auth 서버에서 구현해야함.
결국 omniauth oauth2 strategy를 상속받은 naver strategy는 rack 미들웨어 이고
[1] 네이버로 로그인하기 요청 (/auth/naver) => 인증 서버로 리다이렉트
[2] callback 호출 (/auth/naver/callback) => code <-> access_token으로 교환하고 다음 미들웨어 호출.